

A WordPress domain name, like any other kind of domain name out there, acts as a tool for people to identify and find a website on the web. It’s one of the most important pieces of a website.
The reasons why you want to change your domain name are many. Perhaps you’re looking to completely rebrand your business, and you want a new domain name that better represents your new business name. Maybe you want to change your site from HTTP to HTTPS.
Changing your website’s domain name in WordPress is an easy and straightforward process. However, you need to take each step seriously since it can all backfire on you if something goes wrong. We know of certain users who had lost access to their websites when they changed domain names. Others experienced continuous crashes and bad functionality. To put it shortly, a lot of things can go wrong.
In this article, we will show you how to change your domain name in WordPress.
Why use WordPress?
Before we get into how to change domain names in WordPress, we’ll first dive into why you should use WordPress to build and edit your website in the first place.
The reasons are many. For instance, WordPress is and has always been free to use and open source ever since its creation in 2003. It also boasts a huge collection of free themes and plugins that beginners can use.
Moreover, as you will see later, WordPress is easy to learn and use, and it has a huge community behind it. A simple google search will yield you an indefinite number of videos, blogs, courses, tutorials and more about how to do anything on the platform.
So, it should come as no surprise that there are currently over 455 million sites that use WordPress. That’s around 40% of all websites that we know of on the internet, according to Kinsta.
Additionally, WordPress supports a plethora of media types including, but not limited to: .jpg, .gif, .pdf, .doc, .pptx, .mp3, .mov, .avi, and more.
There is also the fact that WordPress is a favourable platform for search engine optimisation. It automatically creates title tags as well as meta descriptions for all of the pages and posts contained within your websites. This allows for a seamless connection with search engines, potentially improving your standing in search engine result pages rankings as a result.
And of course, as is the case with almost any feature out there, WordPress does come with plugins and tools that allow for more advanced SEO. Our favourites are Schema and Broken Link Checker.
Lastly, WordPress allows for total control of your website. Most website builders out there, such as WIX, Squarespace, have advanced control features that are hidden behind a paywall. And even if you purchase them, your control over your website would still be limited in comparison to WordPress.
Reasons for changing a domain name
Businesses and brands have a number of different reasons as to why they would want to change their domain name. These include, but are not limited to:
- Rebranding: some brands go as far as changing their name, which naturally means that they would need a new domain name. Others find themselves in a better position than they were when they first started, so they can get a domain name that they couldn’t afford before.
- Memorability: you can get a new domain name that is easier to remember for the average internet user.
- Better Web Traffic: it is generally agreed upon that a more relevant domain name will consequently lead to more engagements with your business or brand. And, of course, the more traffic you get, the better your search result rankings will be.
- Cost-Effective: since a new domain name will drive more traffic to your website, you will find yourself needing fewer paid ads and such to get a better search engine placement.
How to change domain name on WordPress
First off, before we get into the nitty-gritty of how to change domain names on WordPress, we need to get one thing out of the way. Make sure to backup everything from your website before you do anything.
You can manually backup your WordPress site by exporting the MySQL file of the website and downloading your files. Simply look for the folder /wp-content/, which contains all your uploaded media, themes, plugins, and more.
You can also do it using the free plugins UpdraftPlus or Duplicator, both of which allow you to either manually perform a backup or to have your website automatically backed up to the cloud regularly. Check out UpdraftPlus’ own blog post for a step-by-step guide on how to back up a WordPress site.
If you think that using one of those methods to back up your website is a bit above your pay grade, worry not, as most hosting providers do offer daily backups either free of charge or for a small extra fee. If you can’t find the option on your hosting dashboard, don’t hesitate to drop the support team a message.
Now that you have fully backed up your website, you can then rely on one of three different approaches to changing your domain name on WordPress.
1. How to change domain name on WordPress using the WordPress dashboard

The best thing about WordPress is the admin dashboard. It allows you to edit and change every tiny detail about your WordPress website(s), including its domain name.
Simply head to your WordPress admin area, click on settings, then general settings. A page will appear, and it contains numerous blocks, including one titled WordPress Address URL and another called Site Address URL.
Replace your old site domain name with the new one in both blocks and make sure that they match. Make sure to include http(s):// in both fields. Once you’re done writing them up, go down and click on Save Changes.
We recommend that you clear your cache after this to eliminate any risks of redirect errors.
2. Using cPanel or FTP Client

Another easy way of changing your domain name is editing the wp-config.php file of your website, which resides on your server. You can access it either by using your cPanel or an FTP client such as FileZilla.
Once you find the file in the public_html folder, right-click on it, then click on Edit. Type in the following code into the file, preferably at the end of the page.
define (‘WP_HOME’, ‘https://newdomain.com’) ;
define (‘WP_SITEURL’, ‘https://newdomain.com’) ;
Once done, click on Save Changes. However, your job here isn’t done as you will need to set up permanent redirects of your old domain. Again, using the FTP client, FileZilla, search for the file .htaccess, right-click on it and click Edit.
Then, type in the following strain of code:
#Options +FollowSmyLinks
RewriteEngine on
RewriteRule ^(.*)$ https://newdomain.com/$1 [R=301, L]
Press Save & Close.
This step ensures that whoever types in your old domain will be automatically redirected to your new website instead of getting a 404 error.
3. Using the WordPress database
The last approach that you can take when it comes to changing your domain name on WordPress is using the database.
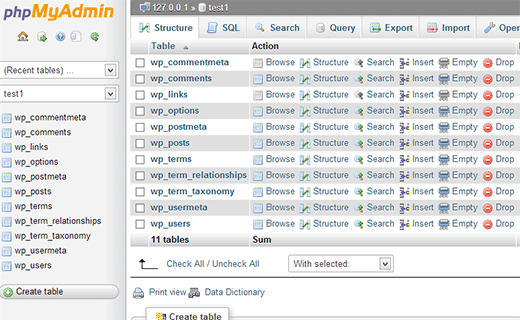
First off, log into your cPanel account and look for phpMyAdmin. Then, on the left-hand side of the page, click on the + button sitting in front of the name of your database. A list of files will appear, look for wp_options and click on it.
You will be greeted with a bunch of rows; your focus should be on the home and siteurl ones. Type in your new domain name in both rows, then click on Go. And that’s it, you’re set.
Once you’re done, make sure to notify search engines of your change using the Google Search Console, the Bing Webmaster Tools, Yandex, amongst others.
4. Using your hosting provider
It’s worth noting that most hosting providers do offer the option to switch your domain name easily. To find how to do it, just Google “how to change my domain name + your hosting provider’s name”. In case you get stuck, just contact the support team of your hosting provider, and they’ll be glad to help you out.
Can’t do it yourself?
We know that dealing with WordPress can be frustrating at times, which is why we have a WordPress development team ready to help our clients with all of their technical problems. Reach out today.
0 Comments